The HTTP protocol is insecure. Any data sent using HTTP is unencrypted/plain-text and can simply be read if intercepted by third parties
This is where HTTPS comes in. However, in order to set up HTTPS on your sites you have to either buy an SSL certificate from a company that is a trusted certificate authority or create one of your own. Buying one, obviously, costs money. Creating your own is fairly straightforward, but is not trusted by all major browsers, so it often pops up the “Not secure” message.
Let’s Encrypt
Let’s Encrypt is a free, automated, and open certificate authority (CA), run for the public’s benefit. It is a service provided by the Internet Security Research Group (ISRG).
It makes it easy to set up a trusted SSL certificate for your website for free. The catch? The SSL certificate is valid for 3 months only. But, you can (again, easily) set up a renewal process, making your site available over HTTPS protocol for a longer period of time.
My desired setup
When building mariomucalo.com, I had the following needs:
- www.mariomucalo.com would redirect to mariomucalo.com (vice versa was also possible, but this looks cleaner in my humble opinion). Having both the www url and just the base url seems unnecessary.
- If mariomucalo.com is requested over HTTP, it needs to be returned over HTTPS.
The site itself is hosted on a Windows Server 2012 R2 on IIS 8.5. It is a WordPress site, but this is irrelevant at this point.
Step 1 – Add your website to IIS
If you already have a website set up, you can skip this step. If not, create a new website for demo purposes.
Create a file called index.html in a new folder and add some content to it (e.g. ‘It works!’).
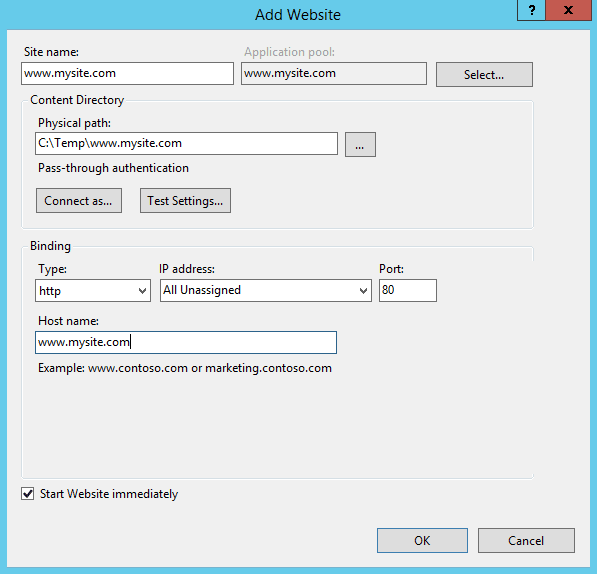
On your Windows Server machine run IIS. There you will have an option to add a new site. The wizard will ask you to add:
- Site Name – the name of your site that will be visible in IIS and that you’ll use internally
- Physical path – the folder where the website is located. Select the folder where your index.html file is.
- Binding – here you tell your IIS which requests it should bind this website to. Let’s first set this up to bind HTTP requests. In the Host name field you enter the host name to be bound to (e.g. www.mysite.com). Later we will be adding more bindings.

If you try http://www.mysite.com in your browser now, it should correctly serve the website. This, of course, assumes that the DNS record for the www.mysite.com points to your server. You can check this by using :
nslookup www.mysite.com
If you do not have a domain set up but want to follow this tutorial, you can “trick” your machine into knowing that it should look for www.mysite.com on your server by editing the hosts file.
Step 2 – Add the necessary bindings
In step one it was possible to add only one binding to our website. For the purpose of this blog post we want to add two: www.mysite.com and mysite.com. In order to do this, in IIS use the Bindings action in the right menu.
Add bindings for:
- www.mysite.com on HTTP
- www.mysite.com on HTTPS
- mysite.com on HTTP
- mysite.com on HTTPS
After this, you can try any of these combinations in your local browser. Both http://www.mysite.com and http://mysite.com should work fine. However, both https://www.mysite.com and https://mysite.com should warn you the sites are not secure and try to drive you away.
Step 3 – Add the SSL Certificate
I will discuss the most basic case here, where you want to add a new certificate from Let’s Encrypt. For this I use a very simple tool called Windows ACME Simple (WACS).
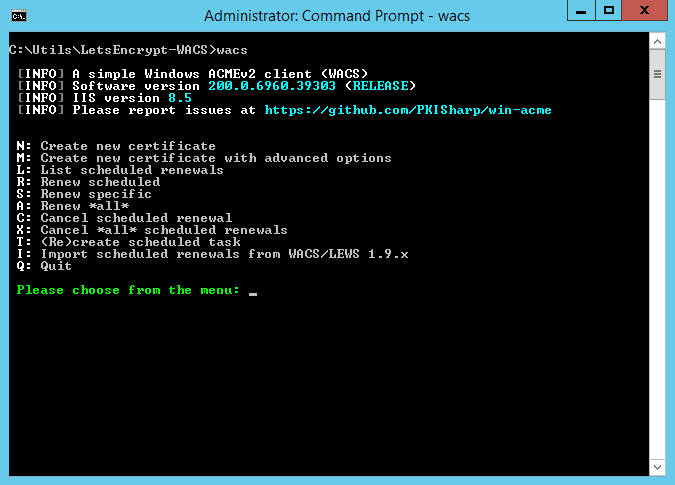
After downloading and unpacking, run wacs.exe:

Use the N – Create new certificate option. If you have a more complex setup, you might need to use the M – Create new certificate with advanced options. In this blog post I am sticking to the basics.
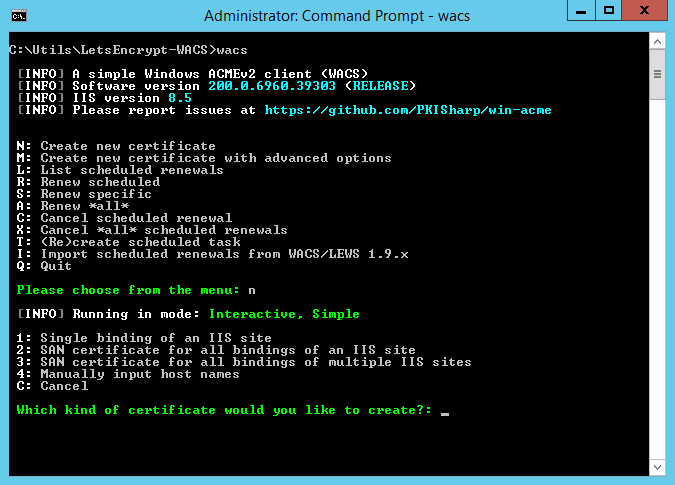
After this, the second option asks you what kind of certificate you want:

Choose 2: SAN certificate for all bindings of an IIS site. This will create an SSL certificate for all the bindings set for a single website in IIS – in our case it is needed so that both www.mysite.com and mysite.com could be served over HTTPS.
Next, the tool will give you a list of all the possible websites in your IIS and ask you to choose the website you’d like.
And that’s it. You will note that the system has automatically added the renewal. If you want, you can manage this on your own, by rerunning the tool and setting up renewals manually, but I usually stick with what is given here.
So – now you have the SSL certificate all set up with your IIS. If you try https://mysite.com in your browser now, you should get your page served. If you want to check what is happening in the background, you can use various tools like Link Redirect Trace Chrome Extension or Redirect Detective.
Step 4 – The redirects
In order to reach my desired setup, I need two redirects:
- From http://* to https://*
- From www.mysite.com to mysite.com
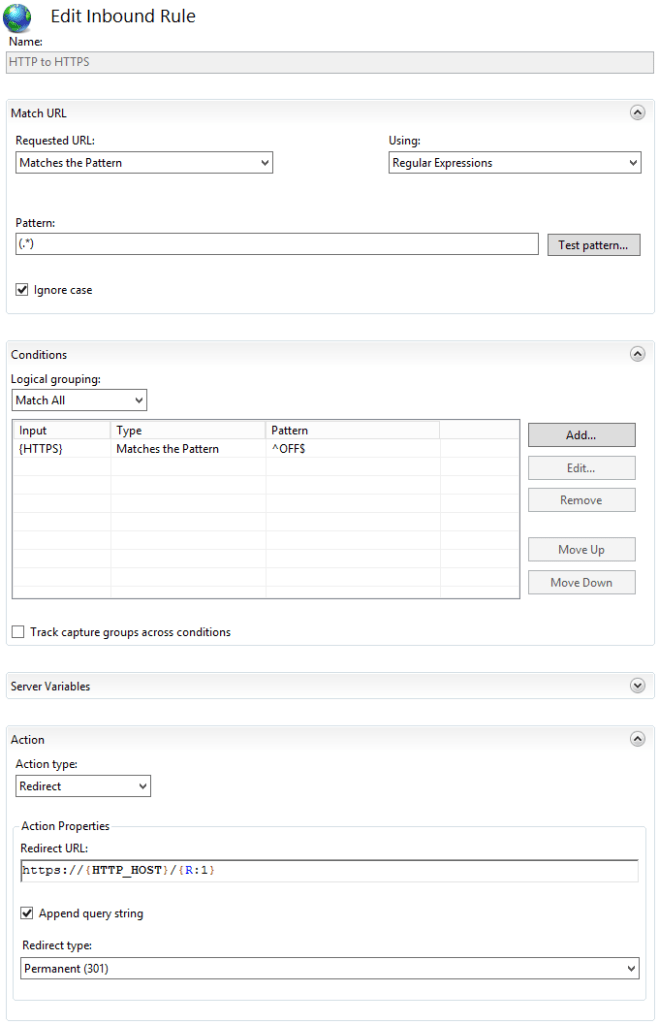
In order to add the redirects to IIS you need to go to your site and choose the URL rewrite module. There you have the option to Add a rule.
The rule to redirect from HTTP to HTTPS looks like this:

The rule to redirect from www.mysite.com to mysite.com looks like this:

And this is it.
To try this out, you can try and go to http://www.mysite.com in your browser and the website should be served, but you should actually be on https://mysite.com.
Additional ideas – HSTS and CSP
There are additional things you could do to protect your users and their data, like setting up HSTS and CSP. I was at the Webcamp Zagreb 2018 conference where I saw a great talk given by Luka Kladarić called The other side of webapp security.
I strongly suggest watching it, as it will provide a better understanding of some of these concepts, how they work and why they are important.
Conclusion
My desired setup on a Windows Server literally takes minutes to set up with most basic options. This is a good enough setup for me at the moment for the applications I am working on and hosting on my server. On larger scale projects containing sensitive data I would advise hiring a security expert for a more robust setup.
I am hoping you can help me out. Please email me.
Scenario:
The issue we are facing is that clients would setup domains in an A record or CNAME like app.customerdomain.com pointed to our domain. That’s on our server like custom.elevatie.com which is binded.
We generate a certificate but where do we bind it because the certificate generated is for client domain which isn’t binded on our system because they have their CNAME/A Record pointed to our custom.elevatie.com to handle all the requests.
But if we were to physically bind the domain on the server and apply the certificate then yes we are able to obtain SSL. But this isn’t the case.
Hello, Steven,
That is a great question and I must say that I am not sure how exactly I’d do this.
But what I think you would need to do is:
And this should work fine. But maybe I am not fully understanding what you need.