When we are taught programming, we are always told to keep the code structured and organized and to make sure to name things properly so it makes sense.
As Blazor introduced quite a few changes into how things are done (as opposed to how they used to be done), I’ll share some practices I used in my two Blazor projects I worked on so far. I won’t be bold as to call them “best practices” because I’ll probably figure out that there is a better way of doing things.
Blazor – quick intro
If you are already familiar with Blazor and the basics – skip this part.
Blazor allow you to build interactive UI web apps on top of C# instead of JavaScript.
There are two ways of running Blazor apps: client side (WebAssembly) and server side. The Blazor client side (WebAssembly) is still in preview mode and announced to be production ready in May 2020. The goal is to compile all the DLLs your code is using into WebAssembly and run it directly in the browser. The second way is to have Blazor run on the server side, but keep a live SignalR connection with your client so it can react to user interactions and manipulate the DOM.
In this post we will be focusing on Blazor Server, but in general I’ll keep the main concepts of organization and naming even on the client side.
Components vs. pages
I use Razor components for everything, even for pages.
ASP.NET Core actually allows you to combine “classic” Razor pages with Razor components inside the same application (an ideal example of this is an example on how to add ASP.NET Core Identity default scaffolded code into a Blazor Server application). However, not to cause confusion for myself, I use components for everything. If there is a problem with this approach, please let me know in the comments.
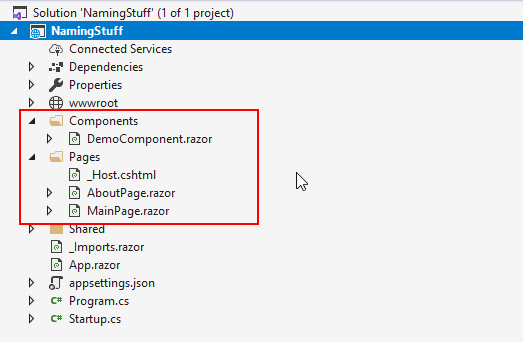
I have two folders: /Pages and /Components.
In the /Pages folder I put all the components that represent pages. These are components that will load once a URL is requested by the browser. Therefore all pages must have an @page directive like this one:
@page "/my-route-here"
I also prefer for all my file names to end with the word Page if they are a page i.e. if they have the @page decorator. So, an example of my page filename would be UserProfilePage.razor, which would have e.g. @page = “/userprofile”.
In the /Components folder I put all the components that are specific for this project and will not be reused. For reusing components I use a component class library which we will discuss later. All my components have the word Component in the file name, e.g. UserProfileComponent.razor.

If I am working on a complex feature that has multiple components, I will have subfolders by functionality. E.g. if I have a very complex user profile, then I can have a different component for viewing the profile, editing the profile, displaying the user image, editing the user image, changing password etc. In such case I’d usually have one main component that will be just a panel in which all these other components are located.
Code and view in different files
When you add a new Razor component to your project with a standard template, you will get a new file that looks like this:
<h1>MyComponent</h1>

@code {

}
In the top part you are supposed to write the view code and in the @code section you write C# code for logic.
I’ve asked about this on LinkedIn, as for me this is a wrong approach. So, here is my opinion: It is not a good practice to have the logic and the visual representation in the same file. I do not see any benefits to this, and I see a lot of downsides.
Dan Roth does not necessarily agree with this. He feels that it is fine to keep the C# code in the @code section if it is related purely to UI. I see his point, but I prefer to separate it as much as possible.
So, I always have a .razor file that represents the view of the page and a .cs file that has the logic in code. In order to do this, the class in the .cs file needs to derive from Microsoft.AspNetCore.Components.ComponentBase. The class name of this class cannot be the same name as the component because the .razor file creates the class with the same name behind the scenes. This is why the common practice is that the class for code behind is named the same as the component with a “Base” suffix. It needs to be referenced in the .razor file with the @inherits directive:
@inherits DemoComponentBase
<h1>Demo Component</h1>
public class DemoComponentBase: ComponentBase
{
  // Logic goes here...
}
If you are using the one-file method, then all this is done implicitly. However, the way I prefer allows you to add layers in between. If there are some properties that you often want to have available in your components (e.g. the NavigationManager), you can make your custom class derive from ComponentBase class and extend that one:
MyComponentBase.cs
public class MyComponentBase : ComponentBase
{
  [Inject]
  public NavigationManager NavigationManager { get; set; }
}
DemoComponent.razor
@inherits DemoComponentBase
<h1>Demo Component</h1>
DemoComponentBase.razor.cs
public class DemoComponentBase : MyComponentBase
{
  // NavigationManager is available here :)
}
If you are using something literally everywhere, you could inject it directly in the _Imports.razor file, but I feel my preferred approach allows more flexibility.
One caveat to using the two-file approach is that you need to make all properties protected in order to be able to use them in the view section. If you are using a one-file approach, you can add private members to the view.
On the whole I still strongly prefer the view and code behind approach.
Component and ComponentBase file naming
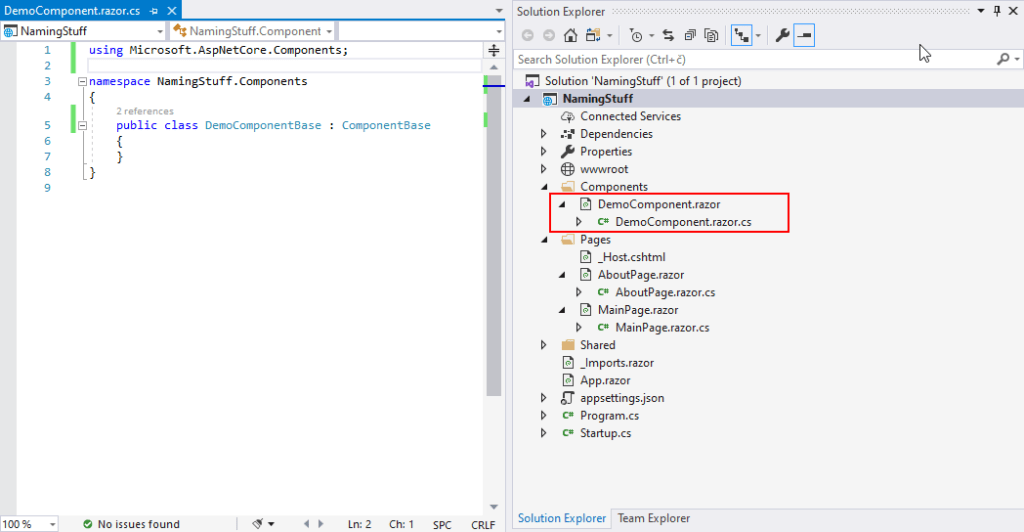
There are two most common ways of naming component and component base files: putting the ComponentBase class in a .cs file that is in the same folder, and called exactly like the class, or putting the code behind in a file with the same filename and having the filename end in .razor.cs.
If you use the first one, you will need to manually mentally connect the fact that the DemoComponent.razor is the view and DemoComponentBase.cs is the code behind.
I prefer the other method. This breaks the convention that a file containing a class definition should have the same name as the class itself. However, if you are using Visual Studio as your IDE (and I am), it automatically nests the code behind under the view – which makes it easier for me to know where is the code behind for each component.

So, I always prefer to have the view in DemoComponent.razor and the code behind in DemoComponent.razor.cs (defining the DemoComponentBase class).
Razor Class Library
It is very often a good idea to put components in a completely separate project – a Razor Class Library.
A Razor Class Library is included into a project the same way any other library would be. Of course, you can include it in multiple projects which means you can easily reuse any components you make. Furthermore, you can use the same component in multiple projects and apply different styles in each of them, but that is possibly a blog post of its own, definitely outside of the scope of this one.
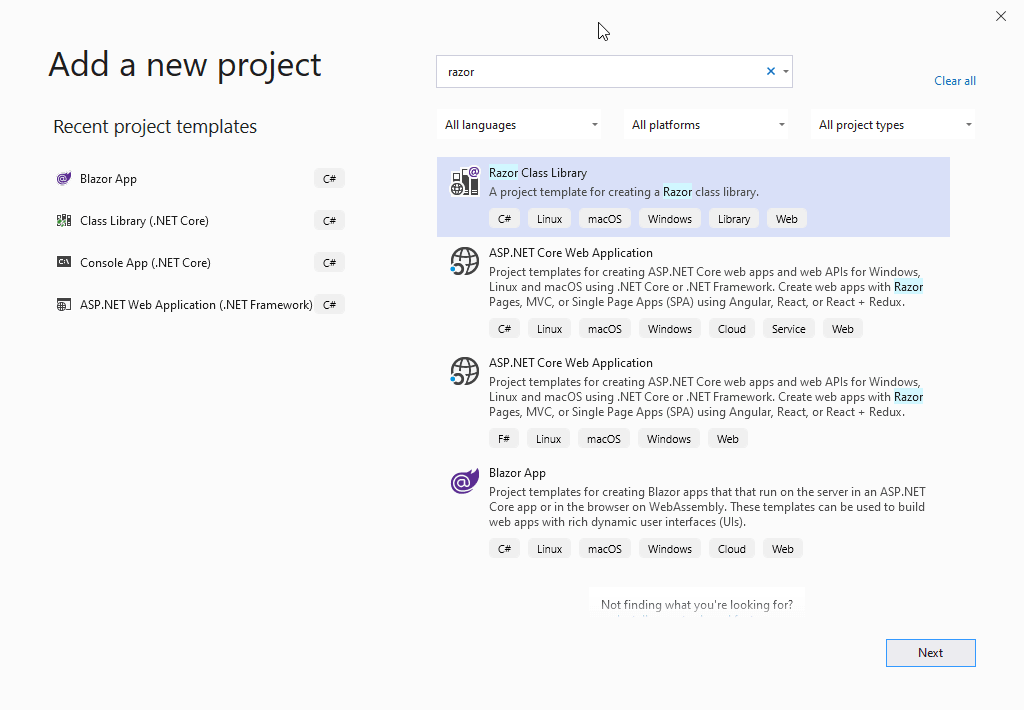
To create a Component Class Library you just use Add New Project, and choose the Razor Class Library project template:

The naming and organization practices I follow in such a class library are exactly the same as I would use for the /Components folder.
If your Razor Class Library is in the same solution, you can just reference the project in your main Blazor application. However, you can have the Razor Class Library as a standalone project, and then provide users with the DLL file. Or you can publish it to NuGet and have users include it in their projects that way.
But, in order to use a component from a Razor Class Library in your project, you need to add a reference (either to a project in your solution, a DLL or install a NuGet package), and then add the using statement:
@using DemoRazorClassLibrary
If this library contains several components that you will be using across your projects, it is not a bad idea to add the using statement to the _Imports.razor file. If you do this, you do not need to add it to each file individually.
After you have added the reference and the using command, you can just use the component in your code like you would any other component.
Conclusion
Just to re-iterate: the topics discussed above are based on my experience and are not necessarily best practices, they worked well for me. If you prefer other organization patterns, please let me know in the comments section. I have created a GitHub repository to provide a basic demo, so feel free to check that out as well.
In the end, I must say I am really excited about Blazor, I really feel it has a strong future ahead of it, especially once they launch Blazor Wasm.
And a big thanks to Dmity, the admin of Asp.NET Core Facebook group for helping out with a few very interesting points.
Thanks for mentioning our community, Mario! It seems most of us are following very similar conventions, which is great as we seem to establish the best practices for Blazor development. There are more interesting topics to cover about Blazor best practices, like what moment to fetch data for pages/components and update the state, or – using async/await-s right for Blazor. I would love to see your readers thoughts on what gaps we have at the moment. There is a related discussion here on Twitter: https://twitter.com/chris_sainty/status/1228629421931847682
Hey, Dmitry,
Great to see that a lot of us follow similar conventions – I guess that means that all of us as a community will form our own best practices soon.
Actually – some of the topics you mention are indeed the topics I am investigating at the moment, and as soon as I have some well rounded ideas, I’ll be sure to share my thoughts here (and elsewhere on social networks.)
I’m starting out with Blazor, doing some small experiments. Wanted a better folder structure than the one in Visual Studio’s boilerplate project, and found this blog entry. Just what I was looking for!
Hey, Marcus,
Thanks for the comment! Glad to be of help!
I was looking for a naming convention this makes a lot of sense. Thanks